
Fireside
Our Node-Based Quest Editor for Fireside
After Paul told you in our last devlog about the procedural generation of our game world and how it barely fits in our small scope for Fireside, I will tell you today about the other feature that barely fits.
Fireside is a heavily narrative driven game and we decided in the first meeting after the Stay Safe Jam, that we need a quest and dialog system which can handle those complex narratives. Our designers went and created a rough feature list for the system: A quest should be able to span multiple bonfires, have multiple characters, react to player input (dialog decisions, item trades etc.) and conditions (travelled distance, item possession). With these requirements in mind I started playing around with scriptable objects in Unity and a system to parse the data in those objects to manage the quest flow during runtime.

I realised quite quickly that scriptable objects are – as expected – a good way to store the quest data, but that there is no way to edit this data without a specialized editor. I had followed the development of the Unity UIElements system and the node editor loosely and thought, this is a great opportunity to look deeper into this subject! I quickly found the three-part Tutorial “Unity Dialogue Graph Tutorial” jumped through it and thought …
this is great, BUT…
midway into the tutorial I noticed that the documentation from Unity is virtually non existent. In addition there aren’t many resources on this topic, because the API is – and will be for the future – experimental. It is mostly for internal use like shader graph and the visual effect graph. But I had to try it out, because the result looked so nice and powerful.
Shout-out to Mert Kirimgeri and his tutorial that allowed me to start with this API. I changed a lot of his architecture, but the videos are a great resource. I try to highlight parts of my system that are important and/or are not contained in the video.
")
You can find a video of the editor in action on our twitter feed.
The basics
The UIElement system is advertised to work like HTML – and it kind of does – but the markup for the UI is created by your code during runtime. So, you create a container (<div>) and add a new text field (<input>) and add the whole container to your parent object for example a node (<body>). Later you can use USS (CSS) to style your UI.
var container = new VisualElement();
var textfield = new TextField(string.Empty);
container.Add(textfield);
node.contentContainer.Add(container);
Not only the basic UI works like this but also the node graph:
- To create a node, you add a new node object to the graph view via AddElement().
- To connect two ports by code, you add the edge to the graph view.
- To add ports to a node, you add the port to the in/output container of the node.
var node = new Node();
node.title = "Empty Node";
GraphView.AddElement(node);

But the basic node doesn’t contain anything. To change that, you can either add it after creation or create a class that inherits from Node. I created a BaseNode class that handles the standard creation process in the constructor, like the position, title and an input and output port. Every other node type inherits from it and expands the constructor. I used a similar system for the ports and created a CustomPort class that wraps the port creation process.
public BaseNode(string nodeName, Vector2 position,
    BaseNodeData nodeData = null) {
    if (nodeData == null) {
        title = nodeName;
        guid = Guid.NewGuid().ToString();
        inputPorts.Add(new CustomPort(PortTypes.QuestFlow,
            Direction.Input, "Flow input", this, false,
            null, Port.Capacity.Multi));
        outputPorts.Add(new CustomPort(PortTypes.QuestFlow,
            Direction.Output, "Flow output", this, false));
    } else {
        title = nodeData.title;
        guid = nodeData.guid;
        foreach (var portdata in nodeData.inputPorts) {
            inputPorts.Add(new CustomPort(portdata.type,
                portdata.direction, portdata.name, this,
                portdata.removable, portdata.guid,
                Port.Capacity.Multi));
        }
        foreach (var portdata in nodeData.outputPorts) {
            outputPorts.Add(new CustomPort(portdata.type,
                portdata.direction, portdata.name, this,
                portdata.removable, portdata.guid));
        }
    }
    RefreshExpandedState();
    RefreshPorts();
    SetPosition(new Rect(position, new Vector2(150, 200)));
}
Dialog node
This node stores all dialog lines from one character that will be displayed after one another without interruptions from other characters, when the quest flow reaches the nodes input port. Therefore, the node contains a list of text fields (that store a line each), a button to create new fields, and a button to remove each field. To specify which character is saying those lines, I added an additional input port for a character node.
private void AddTextField(string value) {
    var container = new VisualElement();
    container.name = "singleLineContainer";
    var textfield = new TextField(string.Empty);
    lines.Add(value);
    var lineIndex = lines.Count - 1;
    textfield.RegisterValueChangedCallback(evt => {
        lines[textFieldContainer.IndexOf(container)] = evt.newValue;
    });
    textfield.multiline = true;
    textfield.SetValueWithoutNotify(value);
    textfield.name = "lineTextField";
    textfield.AddToClassList("yellow");
    var removeButton = new Button(() => {
        RemoveTextField(container);
    });
    removeButton.text = "x";
    container.Add(textfield);
    container.Add(removeButton);
    textFieldContainer.Add(container);
    mainContainer.Add(container);
    RefreshExpandedState();
}
Exposed properties
To manage those characters, I decided to use the exposed property / blackboard system from the Node graph. Each character in the quest is an exposed property in the blackboard (the player, narrator and every other NPC). If the designer adds a character object, then the data from this object is used during runtime for each port where this property is connected to. When no object is specified the system generates a new character for this property, which will be permanent for this quest. The designer can create many nodes of a property with the big plus button, but each one will reference the same object. This works the same way for items.

Condition node
The flow of the quest is controlled by condition nodes, by connecting different nodes to the true and false output ports. At Runtime the conditions are evaluated, and the corresponding output is used. Each condition line is a container with an enum dropdown that selects the condition type and fields for the condition content. The condition type dictates which type of input ports are used for this condition. When the type changes, the old condition line is removed and a new one is inserted.
var conditionTypeSelection = new EnumField(conditionType);
conditionTypeSelection.RegisterValueChangedCallback(evt => {
    var i = conditionHolder.IndexOf(element);
    AddCondition((ConditionTypes)evt.newValue, i);
    RemoveCondition(element);
});
Groups
Groups are a useful feature for a complex editor, but the documentation is especially lacking. A group can be created like any other node and works like you would expect it out of the box. Except you can’t remove anything from the group! To fix this, I added a toolbar to the headerContainer.contentContainer of the group with a remove selection button.
private void RemoveSelectedContent() {
    var selection = QuestGraphView.Instance.selection;
    foreach (var obj in selection) {
        if (obj is BaseNode) {
            var node = (BaseNode)obj;
            if (ContainsElement(node)) {
                RemoveElement(node);
            }
        }
    }
}
Saving and loading
Saving and loading is obviously very important and can be quite complex, which is why you should incorporate it in your design from the start. I decided that the editor saves scriptable objects that can also be parsed by the game at runtime. Since Unity does not allow to have a reference in a scriptable object to the same type, the system uses GUIDs to identify and reference nodes and ports.
The first step of the saving process is to get the list of all nodes and start a recursive function with the entry node of the graph. The recursive function removes the node from the list, saves its content, and checks all edges connected to the ports of the node. If the newly discovered node is still part of the list, the recursion jumps to this node, if not, the node was already saved. Either way the GUID of the connected node is added to a list for this port and the edge is added to a list of all edges. After the recursion has returned all nodes connected in any way to the entry node are saved. The recursion is started again with the first node of the list until it is empty.
To load the quest again, all nodes are created at their old position with their ports and content. In the second phase all edges and nodes are connected based on their GUID references. For the parsing of the quest at runtime the GUID reference of each port is used, to reduce the GUID based searches that would be necessary with the edge list.

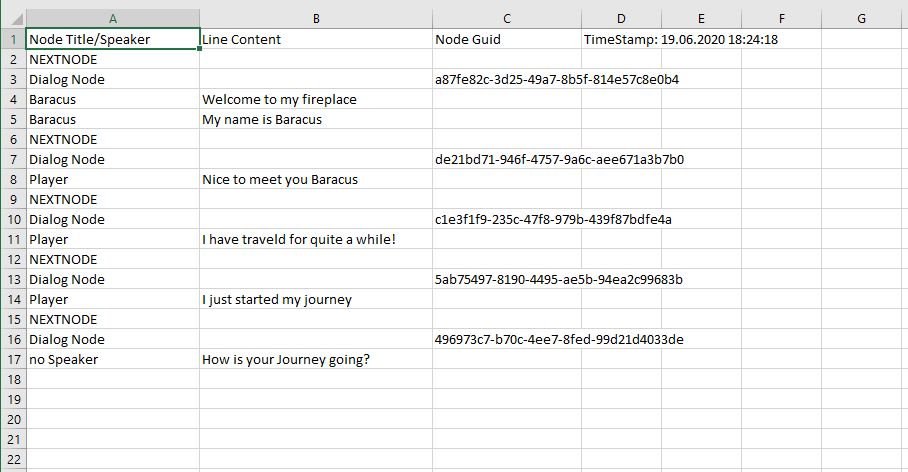
Excel export
To allow for simple spell checking of the dialog lines by non-team members, I created a CSV export feature. For the export the content of each dialog node and its GUID is saved to a CSV with the save-timestamp of the quest. Then the user can load it in excel and change, add or remove lines but not change the layout of the node graph. On Import the GUIDs are matched back to the saved nodes and the lines are copied back. If the timestamps of the CSV and the quest don’t match, the user gets a warning and can choose to ignore it. This should help to avoid accidents that would corrupt the quest (git should be the safety net for everything else).
This system could also be expanded to handle translations for different languages, but since our scope is big enough already, we stick with English.
Final notes
Two things you should note before you jump into Unity and start coding:
- This is my take on how a node-based quest editor could work. Keep in mind that your project might have other requirements, that require different solutions.
- This system is still work in progress, I’m happy with the structure for now, but I will expand and change it over the next months.
What do you think about an editor like this? Would you want to use it as a designer or structure it differently as a programmer? Tell us in the comments below.
If you want to follow the development of Fireside you should check out our last devlog from Paul about procedural level generation and check out our development streams every Thursday from 10:00 AM to 12:00 AM CET at twitch.tv/emergoentertainment.
There is more to this topic than we could ever fit in a single devlog. We will share more in the future, so stay tuned and follow us here on itch.io and join our discord server.
Comments
Log in with itch.io to leave a comment.
Nice! Im also in the process of deciding how i want to go about visualy representing our quest system. My question is, how does the data of the nodes "connect" with anything else in the game? How do you get refrences to quest nodes within the scene's game objects? For example: An object pops up in the scene only if Quest X is complete. How do you make that check?
Hi,
that's a good question. We have bools as exposed properties, that can be set with a node in the quest flow. Those bools can either be local to the quest or global. Global bools have a simple scriptableobject (SO) as reference. So any script that has a reference to the SO can lookup the current value of the bool in our model. The model stores a dictionary from SO to bool value.
We don't use those bools very often to manipulate gameobjects. Their main purpose is to store progress in quests and allow us to check the progress in quest A from quest B by checking the bools of quest A with a condition node. It can also be set from other scripts to change the quest flow. For example whether the player has done something or pressed a button in the tutorial.
A different option to manipulate a scene from a quest is to have a node that does specifically what you want. We have emotion nodes for example, that play a emotion animation on a given character. Or for special tutorial stuff we have a node where we can select a enum value in the node and the node player calls a function depending on the enum value. This function can then do anything in the scene.
I hope this helps you. If you still have questions just ask here or join our discord.
I just noticed that I missed the core of your question, because I thought it was explained in the article:
We have node players that take the data of a node and do something with it. For example the dialog node player takes the text and the character stored in the dialog node data and spawns a speech bubble with the text.
The players are called as a coroutine by a big loop.
Quick Pseudo code:
IEnumerator PlayQuest (stratNodeData) {
var nextNodeData = startNodeData;
while (nextNodeData != null){
var nodePlayer = GetNodePlayerByNodeDataType (nextNodeData);
yield return nodePlaye.PlayNode(nextNodeData);
nextNodeData = nodePlayer.GetNextNode(nextNodeData); // returns null if nothing is connected
}
}
I see, thank you ! I've implemented a quest system myself but it's list based instead of graph based because I was too scared to do editor graph stuff. It kinda works for now but it definitely needs a graph implementation if I'm gonna use it in a bigger project. My implementation is that every quest node is a SO , with a "current state" enum. It also contains references to its own subquests and next quests (which are also the same type of quest node SO). Scene game objects can easily get a reference to the node SO and act accordingly based on the desired state (I mostly just enable/disable game objects ). I will keep your implementation in mind when I eventually tear it all down and build it up again.
I totally understand that building a new graph system is scary and a big time investment. There are also some assetstore/git packages that do similar things to our system you could check out.
In case you have any more questions on our approach, just ask away.