
Fireside
Implementing and optimizing our Level Generator in Unity
Back in May, we talked about the algorithm we’re using to generate the overworld for Fireside. Today we’re back to talk about that some more! When we left off, we were able to generate a set of points on a texture using a perlin noise filtering approach. While this is nice it has two important problems:
- It’s not very fast
- We haven’t actually spawned any assets in Unity
So let’s get to work and fix those problems! If you’ve been following our weekly developer streams you’ve probably seen most of what’s in this article already.
Today we will be:
- Building a framework in Unity which lets us use the texture generation algorithm
- Using the generated textures to spawn some assets in the game world
- Parallelizing texture generation using C# System.Threading.Tasks to speed up the process

Integrating Map Generation into Unity
We’re going to be building on Unity’s Scriptable Objects to create a modular environment for our map generation needs. This way, we give our game designers the freedom to customize the inputs for the algorithm without having to touch code. If you haven’t heard of ScriptableObjects yet, I suggest Unity’s own learning resource as a starting point.
First, we will need a bunch of different data containers. Our pipeline is quite complex and putting all necessary parameters into one object will cause this object to get bloated. So we’re going to use one data package per level of the algorithm.

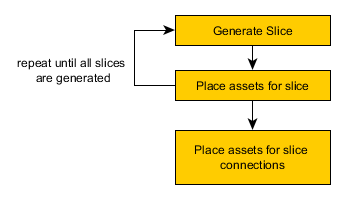
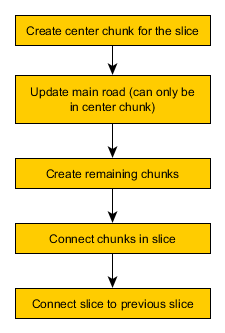
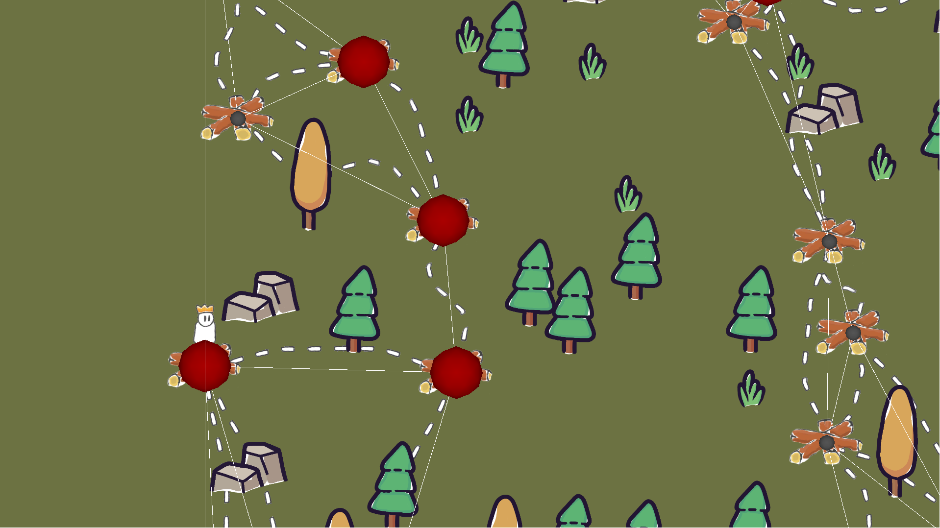
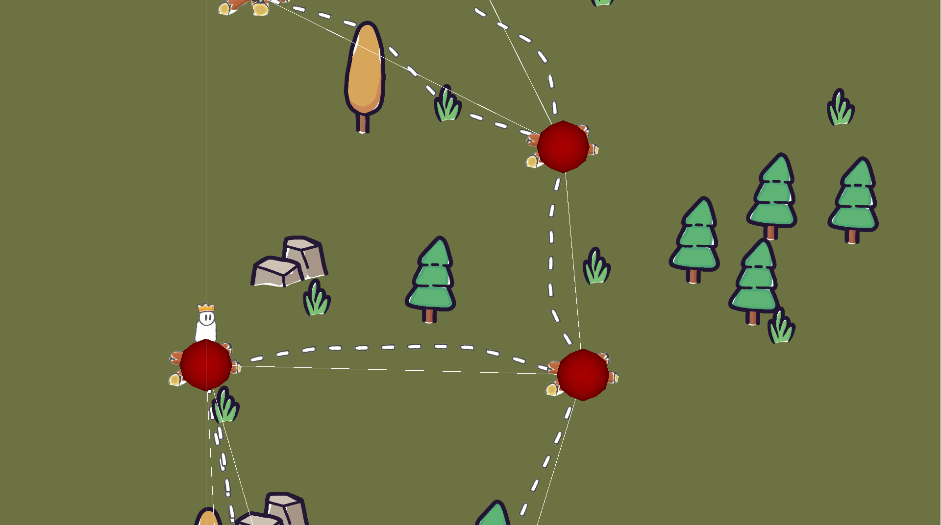
So a map is made up of one or more slices, which are made up of one or more chunks that are made up of one or more textures. Note: Most algorithms skip the slices, but I included this step for some concrete game design & path generation reasons I’m not going to get into in this article. It would be no problem to ignore the slices and still have the approach I’m describing here. Using the very handy ExtendedScriptableObjectDrawer by Tom Kail we can expand the settings for some easy editing.
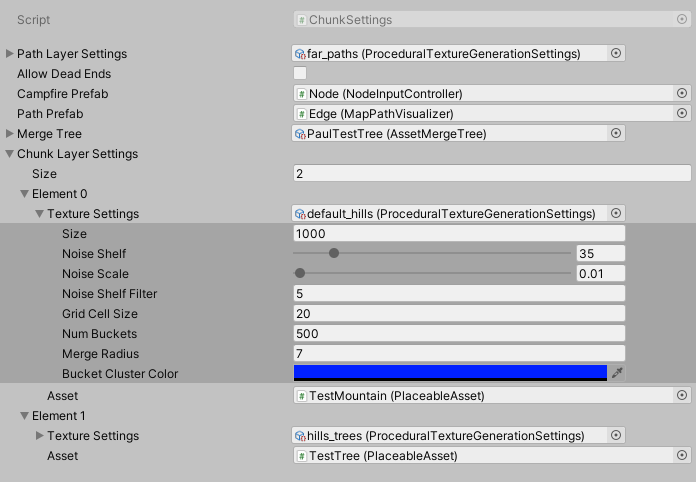
Here you can see what type of data we’re packaging at what level. Basically each texture we generate will distribute one asset on the map. So in order to get a diverse distribution of assets, we need to layer several textures. Splitting the map into chunks and slices allows us to change the generated assets according to the distance from the origin.
Level | Type of data |
Map |
|
Slice |
|
Chunk |
|
Texture |
|
Each data level has an associated C# class which uses a factory pattern which we use to run the logic for each step. If the only thing we wanted to do was distributing some assets, the generation steps would be very straight forward. However, we also need to create paths that the player will travel on. This makes the architecture slightly more complex since we need to connect the chunks and slices after generating the points.
 |  |  |
Disregarding path generation for the moment (this could be part 3 of the developer log; leave a comment if you’re interested!) the only logic we need is how to convert the points we generated on our texture to world space. We do this while considering the scale parameter from our map settings which gives us some nice control over how dense we want to place our assets.
 |  |  |
internal static Vector3 TexturePointToWorldPoint(
            Vector2Int texturePoint,
            float scale,
            Plane plane,
            Vector3 origin,
            ProceduralTextureGenerationSettings settings)
        {
            float tx = (float)texturePoint.x / (float)settings.width;
            float ty = (float)texturePoint.y / (float)settings.height;
            Vector3 right = GetRight(plane) * scale * tx;
            Vector3 up = GetUp(plane) * scale * ty;
            return origin + right + up;

        }
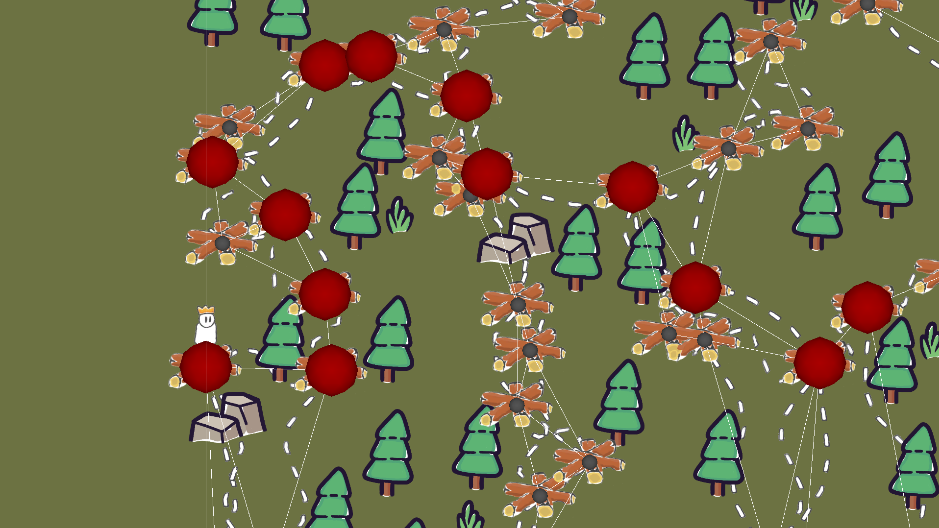
Since we saved each point in world space with the associated prefab, placing the assets is as simple as calling Instantiate for the prefab referenced in the respective layer of the chunk settings. The only thing we need to consider is that our algorithm doesn’t guarantee that assets won’t overlap. For now, our solution will be to give each prefab a collider and destroy all assets we overlap when a prefab is instantiated. As mentioned in our previous developer log, we need to call Physics2D.SyncTransforms() and yield return new WaitForFixedUpdate() for our collision checks work correctly.
public IEnumerator PlaceAssets(Chunk chunk)
        {
            GameObject chunkObject = new GameObject("Chunk::" + chunk.settings.name);
            chunkObject.transform.SetParent(worldRoot);
            ContactFilter2D cf2d = new ContactFilter2D();
            foreach (int layerIndex in chunk.generatedLayerAnchors.Keys)
            {
                GameObject layerParent = new GameObject();
                layerParent.name = chunkObject.name + "::" + "Layer::"+chunk.generatedLayerAnchors[layerIndex].Item1.asset.name;
                layerParent.transform.SetParent(chunkObject.transform);
                foreach (Vector3 point in chunk.generatedLayerAnchors[layerIndex].Item2)
                {
                    PlaceableAsset inst = Instantiate(chunk.generatedLayerAnchors[layerIndex].Item1.asset, layerParent.transform);
                    inst.transform.position = point;
                    Collider2D[] cols = new Collider2D[16];
                    Physics2D.SyncTransforms();
                    int numOverlaps = Physics2D.OverlapCollider(inst.mapgenerationCollider, cf2d, cols);
                    for (int i = 0; i < numOverlaps; i++)
                    {
                        if (cols[i].transform.parent != null &&
                            cols[i].transform.parent.TryGetComponent<PlaceableAsset>(out PlaceableAsset toDestroy))
                            Destroy(cols[i].transform.parent.gameObject);
                    }
                }
                yield return new WaitForFixedUpdate();
            }
}
And there we go! We’ve managed to convert our Processing experiment to a working system in Unity! Buuuut....
It’s slow.
Making it faster
The way we’ll be improving our algorithm is by parallelizing it. Since we’re generating a bunch of textures that don’t depend on each other (but depend on the perlin noise used as a base), we can parallelize texture generation per chunk and even parallelize chunk generation.
The official C# documentation lists async / await as a core language feature of C#. While I’m well familiar with the other features listed on the site, I’ve used neither async nor Tasks in a meaningful way before starting this project. The main reason is that we have a similar feature in Unity. That is *drumroll* Coroutines. In fact, the C# programming references uses a common use case for Coroutines (making a request to a server) as an example. This explains why myself (and many other Unity developers I’ve met) haven’t used C# asynchronous programming yet. It is a very useful feature though and we will be using it here to parallelize our map generation.
//Foo prints the same result as Bar
void Start(){
    Foo();
}
async Task Foo()
{
    Debug.Log(“Hello”);
    await Task.Delay(1000);
    Debug.Log(“There”);
}
void Start(){
    StartCoroutine(Bar());
}
IEnumerator Bar(){
    Debug.Log(“Hello”);
    yield return new WaitForSeconds(1.0f);
    Debug.Log(“There”);
}
There are a few basics to asynchronous programming. Just like Coroutines you need to return a special type (Task) when implementing an asynchronous method. In addition, you must mark the method with the async keyword. You can then use the await keyword in the same way you would use a yield statement in a Coroutine.
However, there is also the very handy Task.WhenAll method which creates a Task that blocks execution until a set of tasks finishes. This allows us to do the following:
//Generates textures for all layers in parallel.
foreach (ChunkLayerSettings setting in settings.chunkLayerSettings)
{
    //generate texture for this chunk
    textureTasks.Add(textureGenerator.GenerateTextureRoutine(
        setting.textureSettings,
        seed,
        chunkCoords,
        new TextureGenerationData(seed, chunkCoords, setting.textureSettings)));
}
result = await Task<TextureGenerationData>.WhenAll(textureTasks);
Opposed to coroutines, these tasks get executed in parallel and do not cost runtime on the main thread. We now simply use this approach when generating chunks as well as textures. This drastically increases our performance from around 10 seconds per slice to 3 seconds per slice.
This leaves us with an algorithm that can generate a reasonably complex and expansive map in around 10 seconds (3 slices). Further optimizations are possible and the performance is controllable by size of the textures used. Still, there is more to talk about e.g. the path generation system. So drop us a comment if you're interested in that and we'll consider the topic for a future devlog! Until then you're much invited to join our Discord server where we'll be sharing updates and discuss Feedback!

Leave a comment
Log in with itch.io to leave a comment.