
Fireside
Be flexible with colors - Implementing a dynamic color system with Unity
Hey everyone, it’s time for another Fireside devlog! This time we’re exploring how we’re applying colors to sprites in Unity. We wanted a flexible system for this, since it allows us to quickly prototype different colorings (while considering the game’s dynamic lighting system) and also enables us to make our game more accessible by providing an interface for an option to change colours at runtime. If you’re looking for more information on how to design for color blindness, check out this paper or the great youtube series on accessibility by Game Maker’s Toolkit.
In this article we want to share our pipeline for implementing runtime dynamic colors in Unity. Note that rendering for our game is sprite-based and we’re using a hand drawn 2D art style.
What do you need?
- Grayscale sprites exported layerwise as .psb
- The Unity psd import package (to import .psb files)
- A shader to do the coloring (watch out for draw calls!)
- plus editor tools to do color picking, etc.
- Some additional code to render a sprite to texture during runtime if you need to show that sprite on the UI
Step 1 - Creating & Importing the sprite
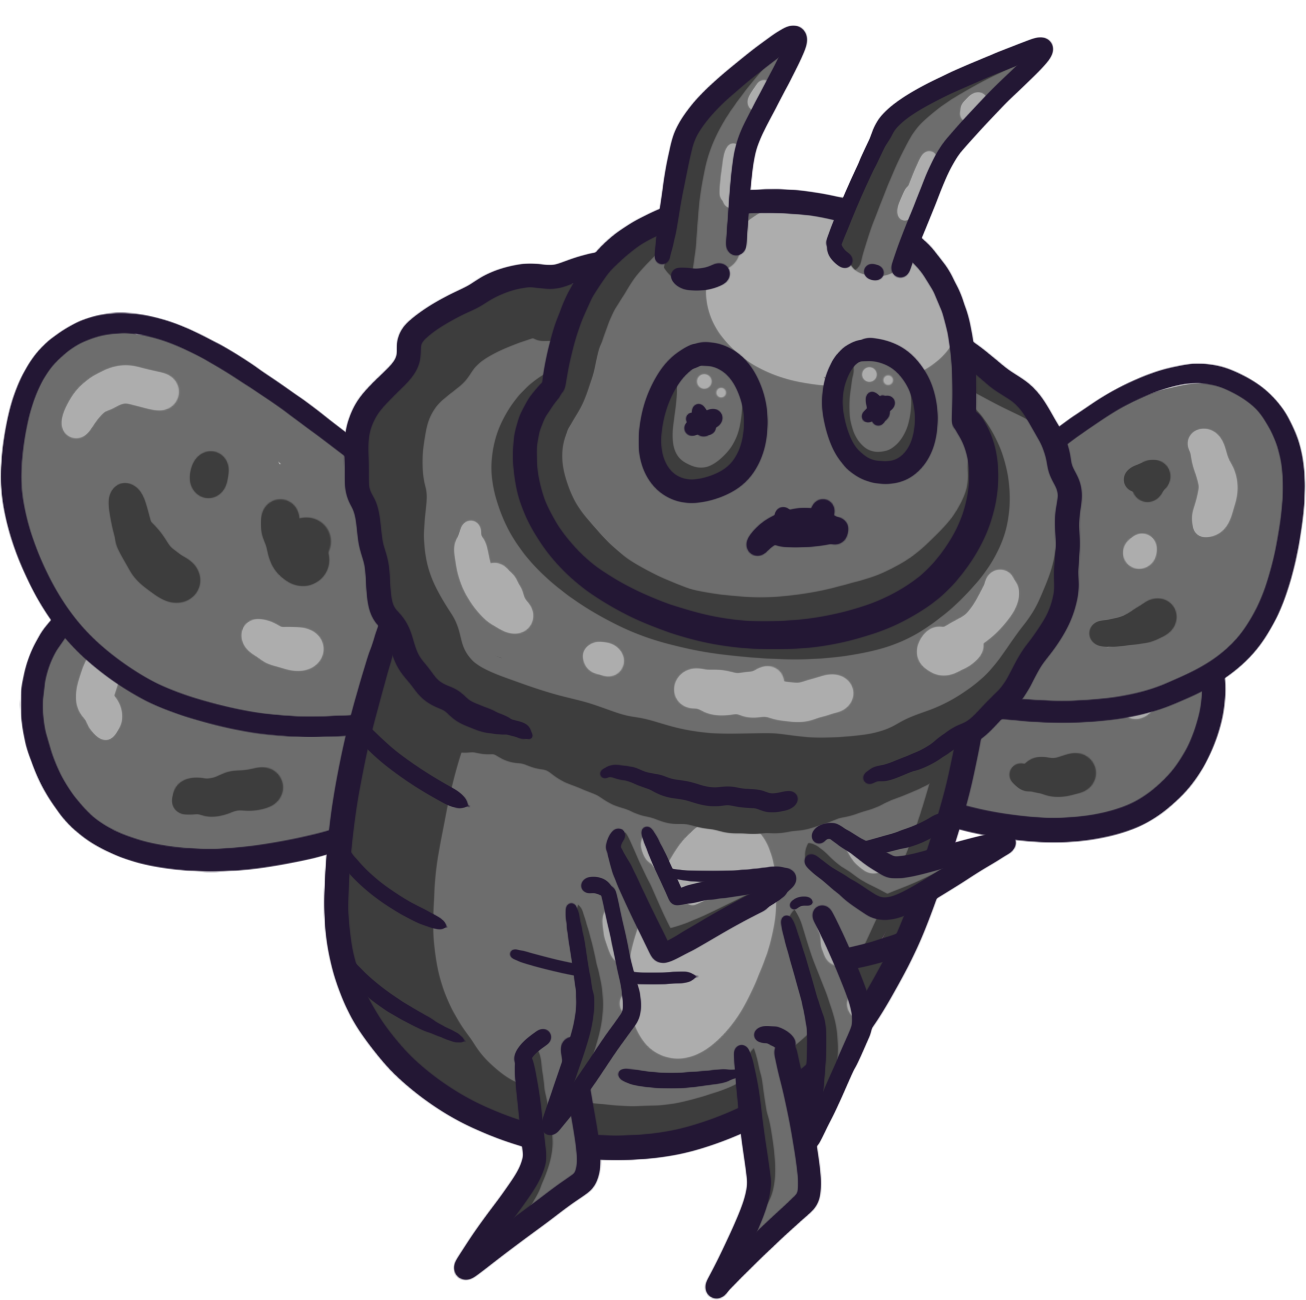
Drawing sprites in grayscale is a standard workflow for digital art. It’s important to separate the layers for the sprite’s outline and different fillings since this will enable us to give them seperate colors and also animate them in Unity. Check out this oversized bumblebee our artist Linus created in Photoshop. You can see different facial expressions layered over each other but also the wings, body, head, antennas, etc. are separated by layers so we can animate & color them individually. Use Photoshop (or Affinity Photo, Gimp, etc.) to save your image as .psb and then use the Unity psd importer to import the file. The Unity documentation provides good guidance on how to exactly structure your files and import them into the engine. Note that directly importing the psd files won’t work since Unity discards the layering on psd files while preserving them on psb files.
A single .psb usually shouldn’t weigh more than 10 mb when using a decent resolution. We chose Full HD as a baseline resolution for our sprites since this will retain the hand drawn detail even if we build Fireside for 4k or 8k monitors because a single sprite will rarely cover up more than one quarter of the screen’s width and height. For Fireside, most sprites are between 1 and 5mb in size, that’s not huge but not tiny either. So for the final builds we need to be able to use Unity to compress sprites further depending on platform and quality settings.
Step 2 - Making the shader
After importing the grayscale sprite, we need to color it. Generally, we want to be able to select from a palette of gradients which we can use to color individual parts of our object. We’ll be using Shadergraph and Unity’s Universal Render Pipeline to make the shader. Basically, our shader will just be interpolating the color values of the gradient based on the gray value of the original sprite. We’ll also add in some additional noise-based coloring to emphasize Fireside’s “paper” aesthetic.
Our first version of the shader simply used two exposed properties for start & end color, defining the gradient. We assigned one material to each layer (which has its own sprite renderer) and that was it. This works great for prototyping. However, since we’re using individual materials for each color, each object might easily use 3-4 different materials. The number of material assets this method generates is an inconvenience but manageable, especially since you can assign the same material / gradient to multiple sprites. You might even argue that this is a good thing, since this way all objects using a certain gradient change color when you decide to modify the gradient (might also be a bad thing, depending on how your artists like to work). However, there is another major issue with this method.

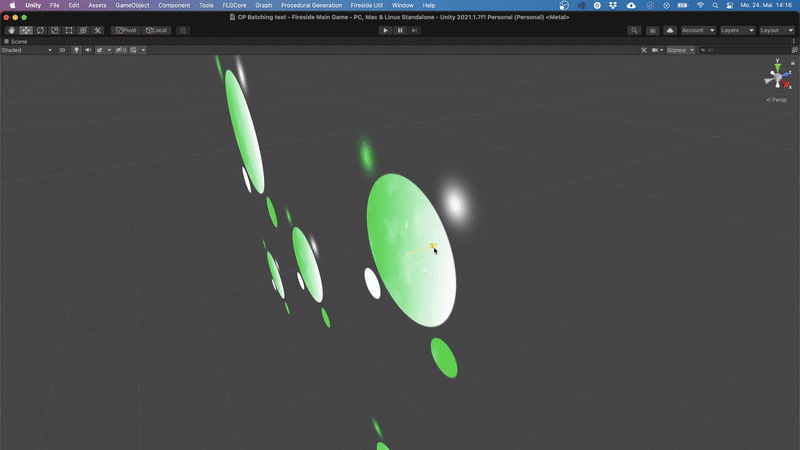
And that is draw calls. Generally (on mobile platforms) you want to keep the number of draw calls your game is making to a maximum of 60-80; the fewer the better. You can check the number of draw calls using Unity’s frame debugger (Window > Analysis > Frame Debugger > The number at the top next to the slide bar shows the number of draw calls needed to render your current game view). You can use a technique called “batching” to group multiple objects into a single draw call. This way, the graphics card can process the batched objects in parallel, which is highly efficient!

However, in our case the number of draw calls can easily exceed the number of objects, since draw calls can only be batched if the materials used to draw the objects aren’t separated in the drawing order. For example, given two materials (A and B) are to be drawn on to 6 sprites, Unity might do 6 draw calls if the materials are “segregated” ABABAB but only 2 draw calls for AAABBB if batching is set correctly. The drawing order can be influenced by many different parameters and depends on the exact renderer used.
For production purposes we should assume the worst case, which means we might have as many draw calls as there are SpriteRenderers in our scene. And since we’re using multiple SpriteRenderers per object (to optimize our animation pipeline), we’d quickly have 1.000 or more draw calls. That’s not acceptable, so we needed to adapt our shader.

Our solution is to save our gradients on a texture and pass that texture to a material. We then do some math to convert an index into uv coordinates on the gradient texture like so:
//for our use case we chose resolution = 16
u = (index % resolution)/resolution
v = 1-(floor(index/resolution)/resolution)
This way we can save one color in one pixel and save 128 gradients on a 16x16 texture. Now all we need is a way to set the index index which doesn’t cause an additional draw call and boom: all our sprites can be dynamically colored while only using one draw call. Changing the color palette at runtime then is as simple as assigning a different gradient texture to the material!
Thus, the only challenge left is what to use as an index. We cannot use a typical exposed property, since setting an exposed property value at runtime creates a material instance which also requires an additional draw call. So for now, we’ve settled on the sprite’s z-coordinate as an index. This is made possible by handling ordering via Unity’s sprite layer system. There probably is some better way of doing this by using some other TEXCOORD channel, and if there are any experts amongst you readers, we’d love to hear your ideas on how to implement this with shadergraph (or maybe we’ll just settle on writing a CG shader instead, although then we’ll also have to redo all the additional noise calculations I was talking about earlier…). Anyway, this method works fine so far, and when supported with the correct editor tool it should be sufficient for fireside. Also, it’s fun to play around with in the editor!
Step 3 - Profit
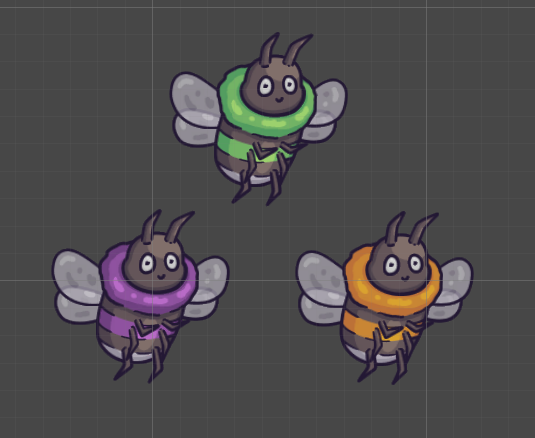
Using this system we can easily prototype colorings for different assets directly in the context of the game. For example, creating variants for trees in different lightings and as mentioned, we even have an interface to support different color palettes for the game.
If you want to engage with Fireside’s development, join our Discord and follow us on Twitter, Tiktok or Twitch! We’re looking forward to seeing you around. Also, leave us a comment of what area of development you’re interested in and where you’d like to have some insight into the development of Fireside!
Leave a comment
Log in with itch.io to leave a comment.